Determining Alert Severity
Determining Alerting Area
Alerting area is an area on the map where police alerts should be active. As mentioned in the previous section, there are two methods for determining that area.
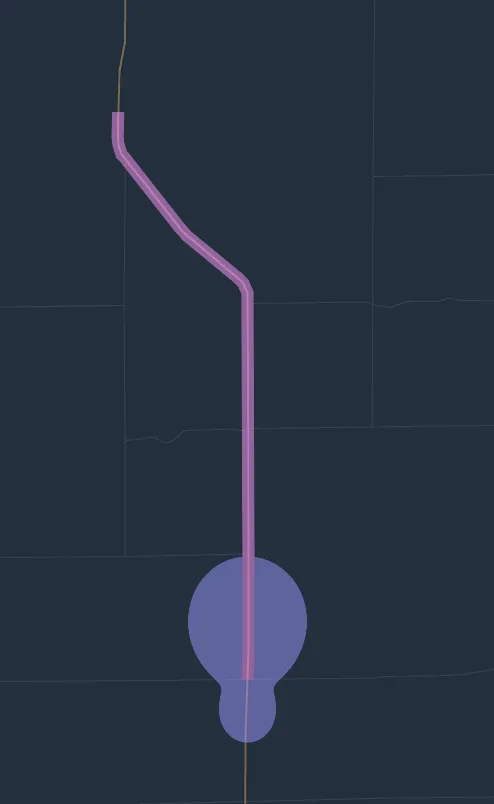
Method 1 (Marked Blue On The Chart Above)
This method doesn't require the current position to be snaped to a street and only depends on the driver's relative bearing to the alert. This method computes the maximum straight-line distance for each relative bearing for which an alert should be active. The road graph data isn't taken into consideration.
This method uses the following parameters to determine the maximum alerting distance for a bearing
- \(\theta\) - Relative bearing from the driver to the alert
- \(F\) - Maximum front alerting distance
- \(B\) - Maximum back alerting distance
- \(S\) - Maximum side alerting distance
Based on the values above, the following intermediate values are computed
- \(\alpha = 0.25F + 0.25B + 0.5S\)
- \(\beta = 0.5F - 0.5B\)
- \(\gamma = 0.25F + 0.25B - 0.5S\)
- \(M = min(F, B, S)\)
Then the maximum alerting distance \(D\) for bearing \(\theta\) is computed according to the following formula
\[D = max(M, \alpha + \beta cos(\theta) + \gamma cos(2\theta))\]
Method 2 (Marked Magenta On The Chart Above)
Method 2 is applicable when the current driver position is snaped to a street on the road graph. Then the street is extended from the current driver position forward until a predefined distance is reached (that distance is configured as "The same street alerting distance"). A 150-meters wide corridor (75 meters to each side) along the street is considered the alerting area.
Note that in this case, the distance is measured along the street, not along a straight line (as in method 1).
If the current driver position can't be snaped to a road graph, this method becomes inapplicable.
Severity Estimation
- The severity is defined by five numbers \(A_5, A_4, ..., A_1\)
for example, let's take \(1, 1, 2, 3, 3\) - We'll also need the maximum alerting distance and the distance to the alert
* in our example, let's take max distance = \(2mi\), distance to alert = \(0.5mi\) - First of all let's find the sum \(T\) of these numbers
* in our example \(T = 1 + 1 + 2 + 3 + 3 = 10\) - Now, divide the maximum alerting distance onto \(T\) small segments
in our example it will be 10 segments 0.2 miles each - \(2mi / 10 = 0.2mi\) - Then, starting from the driver and moving towards the alert
- The first \(A_5\) segments correspond to the severity level 5
* in our example, that would be one segment and distances from 0 to 0.2 miles - The next \(A_4\) segments correspond to the severity level 4
* in our example, that would be again one segment and distances from 0.2 to 0.4 miles - The next \(A_3\) segments correspond to the severity level 3
* in our example, that would be two segments and distances from 0.4 to 0.8 miles - The next \(A_2\) segments correspond to the severity level 2
* in our example, that would be three segments and distances from 0.8 to 1.4 miles - The last \(A_1\) segments correspond to the severity level 1
* in our example, that would be three segments and distances from 1.4 to 2 miles
- The first \(A_5\) segments correspond to the severity level 5
- Then we need to find into which segment does the distance to the alert \(V\) fall
* in our example that is the segment corresponding to severity level 3 as \(0.4 \le 0.5 < 0.8\)
The images below shows areas corresponding to different severities when "combined" alerting strategy is used, severity estimation algorithm is "1 1 1 1 1", and alerting distance preferences are front = 1mi, back = 0.5mi, side = 0.25mi, same street = 5mi.

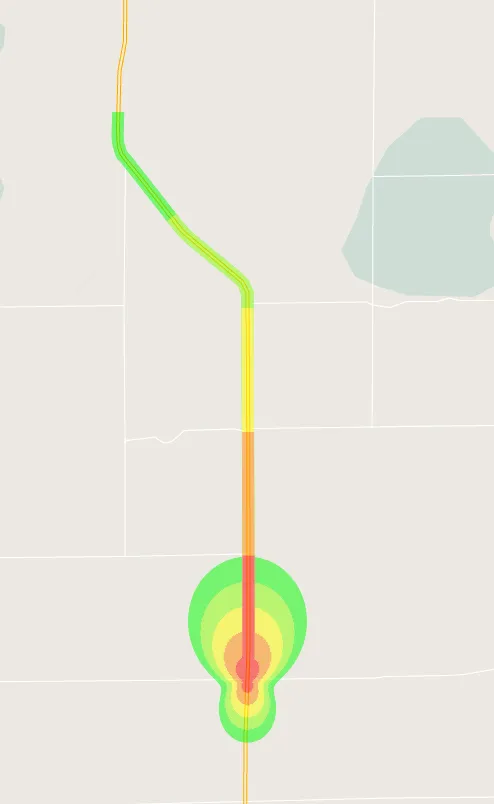
The same info, but for nerds
Alert severity is based on the maximum alerting distance \(D\) and an actual distance to the alert \(V\).
- If method 1 was used for estimating alerting area, then \(D\) is taken from the formulas above, and \(M\) is a straight line distance to the alert
- If method 2 was used for estimating alerting area, then \(D\) is equal to the value of "Same street alerting distance" preference, and \(M\) is a distance to the alert along the street
- If the combined method is used for severity estimation, then the maximum severity value of those produced by the two methods above is used
Alert severity algorithm is defined by 5 values \(A_5, A_4, ..., A_1\).
Formally the severity \(Q\) of an alert is defined by the following formula
\[Q = \max_{i=1..5}(i | \frac{\sum_{j=i}^{5}A_j}{\sum_{j=1}^{5}A_j} > \frac{V}{D})\]